December 29, 2012

Instant Espresso!


While growing up in India, coffee shops like Starbucks and Pete's were unheard of. There were a few old old-timey Oxford-style coffeehouses which were frequented by men and women of my parents generation.  Espresso-style coffees were served in restaurants but the Barista-operated coffee shops are a relatively new concept in India. Growing up, we would make this home-made version whenever we felt a yearning for an espresso-based latte. It looked amazingly pretty each time and tasted just as good.  Now that I live in the US, and have access to Starbucks :) I rarely make this mix ... except when we're reminiscing about our childhood, or when we're sitting at home on a cold snow-stormy winter day, like today!!!

Prep Time: 10 min

Ingredients:
  1. 4 tbsp Instant coffee
  2. 1-2 tbsp Raw Sugar, to taste
  3. 2-4 tbsp water
  4. Non-Dairy Milk
Directions:
Add coffee, raw sugar and a couple of tablespoons of water (enough to soak the coffee and make a slurry) to a small plastic cup and using a hand-held blender, whip the mix into a thick foam. If you don't have access to a electric hand-held blender, you can also use elbow grease and mix it with a spoon until the coffee and sugar are well blended together and make a deep brown whipped cream-like mix. If it appears too thick, add a tablespoon or two of water. This mix, because it has no dairy, will stay in the refrigerator for up to 7-10 days. 

In a sauce pan, or in the microwave, heat non-dairy milk (I used Vanilla flavored soy milk). Pour steaming hot milk into a cup, add a heaping teaspoon of the mix to the cup (when well whipped, it will immediately float to the top, because of the air mixed into it).

Stir and Serve :)

Arti's Aloo Paratha

So, my sister-in-law Arti makes the best food. Whenever I visit her, as we are now, I can be assured of a feast, or two, or several, during our visit. This morning, she made Aloo Parathas. This is the ultimate breakfast food in India. Historically, parathas fried in butter, and served with fresh butter, mango and chili pepper pikles and often also with fresh plain yogurt. Keeping in line with my food choices (no added fat), she made my parathas without oil or butter. Amazing!!!

Arti's Kitchen ... 
A Paratha is basically a stuffed Indian flat-bread made with unleavened dough and originating from the Indian state of Punjab. My DH calls them potato pancakes except they're typically savory and spicy and you don't pour syrup over them. A ball of dough is stuffed with crumbled spiced vegetables or cheese (potatoes, cauliflower, mint, radishes, paneer, onions, fenugreek, lentils, etc.). The dough is then rolled out and is the pan-fried or pan-roasted on a flat skillet. Another "cheater" method is to roll out 2 chapatis (see link here). Cover the surface of one with the filling and then cover with the other (like a chapati sandwich). Pan-fry or pan-roast as described above.

Arti's Pan-Roasted Aloo Parathas
Prep Time: 15 min

Ingredients for the Filling: 
  1. 4-6 Steamed/Boiled Russet potatoes, crumbled
  2. 1 small Red Onion, diced finely.
  3. Cumin, to taste
  4. Red Chillies, to taste
  5. Ajwain (Carom) seeds, to taste
  6. Amchoor (Dried Mango powder), to taste
  7. 2-3 tbsp fresh Cilantro leaves
  8. 2-3 fresh Serrano peppers, sliced, to taste.
  9. 2-3 tsp Dried Mint leaves
  10. 1-2 tsp Garam Masala
  11. Salt and Pepper, to taste.
Directions:
Prepare the whole wheat flour into dough (see link here). Prepare the potato filling by mixing the above ingredients together. My sis-in-law cooks the Indian way, so all spices are estimates. Taste check after each spice and once the filling is yummy :) you're all set. Roll out a ball of dough into about a 4 inch round. Place about a heaping tablespoon of filling in the middle and fold over the sides and pinch the top closed. Flatten the stuffed dough and then roll out gently into about a 6-7 inch round. Gently lift the rolled out dough and transfer to a hot skillet and pan roast on both sides until done. If you're okay with using butter, add a little butter and pan-fry instead. The difference is only visual. Both taste equally yummy!

Arti's Pan-Fried Aloo Parathas
Cooking Tip: If you want to save some for later, partially fry each one, and store some for later in a tupper-ware (use saran wrap between individual parathas if you want to freeze them for later). When ready to eat, transfer to a skillet and complete the cooking process :)

Arti's Aloo Parathas .. some for later :)
My Assessment: LOVED my breakfast today!! As did my DH :)


December 26, 2012

The Kitchen Sink Soup

Cold winter days call for a heartwarming soup and some home-made bread. I got wish #1 today. My husband coined the term The Kitchen Sink Soup - according to him ... "Its got everything in it, but the kitchen sink!" ... well yes, it is kind of true. I always use the same basic recipe and it works like a charm, every time, no matter what you put in it. 

The Kitchen Sink Soup
Prep Time: 20-30 min

Ingredients:*
  1. 2 cups Protein (Red Kidney Beans, Black beans, Chick Peas, Various Lentils)
  2. 2 cups Vegetables (Onion, Spinach, Green Beans, Corn, Peas, Carrots, Kale, Celery)
  3. 1/2 cup Starch (Red Potatoes, White Potatoes, Brown Rice, Wild Rice, Barley, Quinoa, Noodles)
  4. 1/2 cup Mushrooms (white, cremini, shiitake, portabella, oyster)
  5. 4-6 cups Vegetable broth
  6. 6-8 Dry Sun-dried Tomatoes (I buy the Whole foods 365 brand), sliced/diced.
  7. 1 tbsp Minced garlic
  8. 1 tbsp Miso (Barley or Soy).
  9. Pepper, to taste.
Directions:
Line a stock pot with vegetable broth and add garlic. Once the garlic begins to release its aroma, add remaining ingredients (except Miso). Bring to a rolling boil. Reduce heat and allow to simmer until whatever starch you've added are done. When I use beans and/or chickpeas, I typically use canned. When I use lentils, I tend to use red lentils which are quick-cooking. Once starches are done cooking, turn off heat and add miso. I used Barley miso today. I typically don't discriminate between various kinds of Miso and use them interchangeably in my recipes. Do a quick taste test and if needed added more broth (as needed) and miso for flavor, or salt (if you prefer). Garnish with freshly ground black pepper and serve steaming hot. 

The Kitchen Sink Soup
Today, I used Red kidney beans, Baby spinach, Red Onion, Green Beans, White mushrooms and a blend of Brown and Wild rice. Umm Umm Good!! 

Wish #2 (homemade bread) will be granted soon ... Santa brought me a B&D Bread Maker!!! Yeah!!!


* This is a 'no added salt' recipe i.e. no salt is added over and above what is already in the condiments. In this soup, all the salt is coming from Miso and the sun-dried tomatoes add a lot of flavor, thereby reducing the need for additional salt. 

December 23, 2012

Veggie Fact of the Day


Unlike the orange cauliflower which carries a mutation, Purple Potatoes are actually a heirloom variety of potatoes. They are available year-round in some of the upscale grocery stores across the country.

Most common people think they're colored artificially, kind of like those odd-colored daisies you can buy in Walmart. Purple potatoes are rich in the anthocyanin, an antioxidant found in other blue, red and purple fruits such as blueberries and pomegranates. 

Anthocyanins are powerful immune system boosters and have been shown to have some protective properties against various cancers. The odd looking (in my humble opinion) purple potatoes have deep violet, ink-colored skin and flesh. Some varieties, like the ones I bought are marble throughout the flesh. The purple potato is native to the Lake Titicaca region of Peru. Some of the cultivars are as many as 8000 years old

Herb Roasted Purple Potatoes

In my quest to try new veggies, I've often come across colored varieties of vegetables that we've all eaten in their normal color. This morning I posted a recipe for Orange Cauliflower and now I have the honor of introducing to you, the rather odd looking Purple Potato - my New Veggie #62.

Herb Roasted Purple Potatoes

Prep Time: 20 min

Ingredients: 
  1. 2 lb bag of Purple potatoes 
  2. 2 tbsp ginger/garlic paste 
  3. 1 tbsp whole mustard seeds 
  4. 1 tbsp McCormick's Steak Seasoning 
  5. Splash of water/vegetable broth
  6. Salt and Pepper, to taste
  7. 2-4 Fresh Basil leaves
Directions: 
Herb Roasted Purple Potatoes - New Veggie #62
Preheat oven to 375-400 F. This recipe is almost identical to my Roasted Red Potatoes recipe which I posted earlier this month. The only difference, since I'm not cooking for omniviores, I removed all the oil from the recipe. Rinse and cut tomatoes into halves. Mine were all around the same size but if you have uneven sizes, you may need to cut some into quarters to ensure that all the pieces are about the same size. Add all the potatoes and spices into a gallon bag, add a splash of water or vegetable broth and toss everything together until the potatoes are well coated. Spray a large baking sheet with cooking spray (very light, just enough to prevent sticking). Spread potatoes in a single layer and roast uncovered for 10-12 minutes. Mine were tender in 8 minutes, and then I turned on the broiler for 2 minutes to add a touch of crispiness. Garnish with freshly cracked black pepper, and fresh basil. Serve warm. 

My Assessment: Like every other colored version of a regular veggies, I could not tell a taste difference except that these were a tad less starchy than the red potatoes. Overall, A+


One-Year Anniversary Giveaway!!!

As I approach one whole year of being plant-based, I am in absolute awe at how easy it has been and how my cravings for meat and dairy have disappeared. I started this journey on December 31, 2011 and although I am not a perfect Herbie by any means, I am proud of the changes I have made in my life in 12 short months. When I started this journey, my intention was to try it for 3 months. Every book I read, every website I perused, told me that it if I lasted 3 short months, I wouldn't got back to the Standard American Diet. I guess they all knew what they were talking about :)

In 12 months, I've lost 21 lbs! I was aiming for 30 but I couldn't get past 21 lbs, no matter how hard I tried. No sweat ... because my total cholesterol numbers (when I checked it on November 30, 2012) was 160 mg/dL. Not quite to where Dr. Esselstyn recommends (< 150 mg/dL) .. but I know I'll get there soon!!!

Before & After - 12 Months later!
An old friend that I recently connected with on Facebook asked me about my journey and how I managed to stick with it. She asked me what recommendations/suggestions I might have for someone like her who has lived so far on the Standard American Diet, has tried before and failed for various reasons in completing the transition and sticking with a plant-based lifestyle. I responded to her in a private message, but I figured I should share some of what I have learnt this past year with everyone.

First of all ... A Whole-Foods, Plant-Based, Oil-Free plate ... looks & tastes amazing!! These are all pictures of foods I've made and enjoyed over the past year. It is truly amazing how much more variety I have in my diet now that I am eating plants ... and of his own accord, my Meat and Potatoes husband is now on a WFPB diet and he doubts he'll ever go back to the SAD (Standard American Diet). If he can do it ... so can you!   


I wrote a blog post called "Why I'm Vegetarian .." on my one-month anniversary. Most of the knowledge I had imparted at the time was, and still is, available widely on the internet.  Animal products, meat and dairy aren't meant for human consumption. Cows milk is intended to fatten a calf ... guess what it does to us? Animal products have cholesterol. Human bodies are capable of making all the cholesterol they need, so why pump ourselves with more of an ingredient which we have enough of, can make enough of, and know that excess can only be harmful.

The benefits of a whole-foods plant-based diet are immense with the most important benefit being your health.  Give it a try - Give up meat and dairy because you're so worth it!
  • Just do it! Give it up Cold Tofu! I did it - So can you! Challenge yourself for 28 days or 6 weeks, or whatever floats your boat. See how you feel and then decide how you want to go on with your life. 
  • If you're unsure Give it up - One thing at a time - try Meatless Mondays. Then slowly add another day and then another! 
  • Focus on one meal at a time. Prepare, enjoy, take a few pictures, share those on Twitter and Facebook (we love to see food pics!!). When that's done - think of the next meal!
  • Have a leafy green salad before every meal - It fills you up so you eat less of the meat and fatty foods!
  • Drink lots and lots of water to keep you feeling full, your kidneys working and your body cleansed. 
  • LOVE your carbohydrates! Eat bananas, carrots, apples, oranges, peaches, pears, cucumbers, celery, radishes, corn, potatoes ... LOVE your potatoes.  The term "Low Carb" is the biggest marketing strategy of our times. Our bodies run on carbs - not protein.  
  • Don't focus on what you're cutting from your diet - focus on what you're adding in. Try new foods, grains, fruits and veggies - check out the Wikipedia List of Culinary Vegetables - you'll be shocked at how few you've tried! I challenged myself to eat new plant-based foods this past year and as of today, I've tried 62 New Veggies and Plant-Based products. 
  • If you slip-up - don't fret - don't beat yourself up - and don't give up on your entire diet because you slipped-up on a piece of cake or a cookie. Make amends at the next meal ..!
  • Even after one whole year, my downfall are desserts and sweet treats - the ones where added dairy and animal products (i.e. eggs) aren't immediately apparent. Know that it is not sugar that's bad for you - it's the added oil and fat and cholesterol in desserts. Try some of the awesome fat-less, dairy-free desserts made by Happy Herbivore and Chef AJ and others. Recipes are widely available online.
  • Love your kitchen. Even if you hate to cook, you can always make a salad. As you experiment more, you'll become more and more comfortable in the kitchen. Pamper your kitchen. Let your first purchase be a good set of Chef's knives. 
  • Add spices and herbs to your pantry and to your diet. Not only do they add flavor and variety, they provide essential oils and medicinal properties. If you've never used anything other than Pepper and Basil, experiment. Buy small quantities until you find the ones you like. Ethnic stores and Dollar stores are great places to pick up spices on the cheap.  
  • Buy the "Happy Cow" and "VeganXpress" apps for your smart phone for when you're eating out. 
Here are some links to some websites, books and movies which I read and researched as I began my journey, and which I continue to go back to for motivation and advice.
  1. Unprocessed - Chef AJ
  2. Food Rules - Michael Pollan
  3. Eat to Live - Dr. Joel Furhman
  4. Forks Over Knives - The Movie. 
  5. The Engine 2 Diet - Rip Esselstyn
  6. The China Study - Dr. T. Colin Campbell
  7. The Starch Solution - Dr. John A. McDougall
  8. Appetite for Reduction - Isa Chandra Moskowitz
  9. Prevent and Reverse Heart Disease - Dr. Caldwell B. Esselstyn
  10. The Happy Herbivore Website and Cookbooks - Lindsay S. Nixon

To commemorate my First Anniversary as a Herbie i.e. a fan of Happy Herbivore, and a person who eats a whole-foods, plant-based, no-added-fat diet, but does not identify oneself as a vegan (here's why!) ... I'm having a Giveaway. The lucky winner will receive a copy of the newest coolest cookbook on bookshelves this December - Happy Herbivore Abroad by Lindsay S. Nixon.  In January of 2012, I accidentally came across The Happy Herbivore website while searching for a recipe for Butternut Squash. I found her page on Facebook and asked her a question about the recipe. She wrote back in just a few short hours. And that was it ... I was a fan!! Lindsay made it seem so easy and so doable. I bought both her cookbooks that same month. I have enjoyed her first 2 books immensely and that's the reason I'm offering her newest cookbook as a prize to the lucky winner. I recently had the opportunity to e-interview this lovely, very-humble, lady. Check out the interview here if you haven't seen it yet. 

Since my audience is international, this giveaway is international as well. I will ship it to the Lucky winner, anywhere on Planet Earth :) !!! Of course, if you're not in the US or Canada, you will experience some delay in receiving your book as I will be sending it by standard mail (yes, I'm cheap! and I have teenagers to feed!).

Leave a comment below. Tell me if in the last 12 months, you have tried any new plant-based foods? And if so, what was your favorite New Veggie, and why? Then, follow the link below to enter to win a free copy!! The giveaway opens tonight and ends on my one-year anniversary - December 31, 2012. I will announce the winner on this blog post, as well as on my Facebook Page.  

As Chef AJ always signs off ... Love & Kale!!!

   a Rafflecopter giveaway

Veggie Fact of the Day

Orange Cauliflower - New Veggie #61
Orange Cauliflower - I've previously posted a New Veggie Fact of the Day regarding the Cauliflower. The orange variety, contrary to popular belief, was not made in a lab by crazy scientists and is most definitely colored artificially. The orange color is a result of a natural genetic mutation (discovered in Canada in 1970), which allows the vegetable to hold more beta carotene, or Vitamin A (up to 25 times the level found in its white counterpart). Despite the unique color, the flavor and texture is indistinguishable. Here is a great article about the history of the orange cauliflower that was published in the Saveur Magazine

Roasted Cauliflower

I've previously tried purple and white cauliflowers and added them to my new veggie list. I did also try orange cauliflower earlier this year in my quest to try new and interesting veggies but somehow I forgot about adding it to the list. So here it is ... New Veggie #61 - Orange Cauliflower.  

Oven Roasted Cauliflower
Prep Time: 30 min

Ingredients (2 Servings): 
  1. One head of Orange Cauliflower (about 2 cups of florets). 
  2. 3 tbsp Nutritional Yeast
  3. 1 tbsp McCormick's Steak Seasoning*
  4. 1/2 tsp Smoked Chipotle Pepper powder.
Directions:
Preheat oven to 425 F. Rinse the cauliflower under running water. Remove stems and cut the head into approximately equal sized pieces. Save any small pieces that fall off as well (don't discard). Rinse the florets under running water in a colandar. Put remaining 3 ingredients in a gallon sized zip-lock bag. Add drained (but still wet) cauliflower pieces, including any small pieces to the bag. Close and toss everything together to evenly coat the cauliflower with the spices. Spray a large baking sheet with cooking spray (very light, just enough to prevent sticking). Spread large pieces in a single layer and roast uncovered for 10-12 minutes. Remove from oven, turn each piece with a pair of tongs, and return to the over for another 10-12 min. When the second session is about half-way done, remove the baking sheet from the oven and add the crumbly pieces to the spread those out evenly on the tray. Return to the oven. Roast until the smaller pieces begin to brown and the larger pieces start to caramelize (about 5-6 min). Serve warm, as a side, or as the main dish, with some toasted bread or baguette slices.


Nutritional Information (Per Serving): Calories 70.0, Total Fat 0.6g, Total Carbs 10.4g (Dietary Fiber 4.9g, Sugars 3.0g) and Total Protein 8.3g.

My Assessment: For being only 70 calories per serving, we didn't feel guilty having HUGE servings on both our plates. I've always loved cauliflower, as I grew up eating the white variety. My achievement of the day, I made my DH try it and although he has previously almost gagged at the mention of eating cauliflower, he actually liked this preparation and LOVED it!!! :) 

* Ingredients of McCormick's Steak Seasoning, just in case you don't have access to the blend - Coarse (Sea) salt and spices including black and red pepper, garlic, some sunflower oil and a hint of paprika). 

December 19, 2012

Veggie Fact of the Day

Curly Mustard Greens, New Veggie #60
Spicy, crunchy Mustard greens are one of the most nutritious leafy foods we can add to our diet. The leaves are loaded with Vitamin A, beta-carotenes, Vitamin K and flavonoid anti-oxidants. 

Mustard belongs to the same family as cabbage, broccoli and Brussels sprouts. Mustard leaves, flowers and seeds play an important part in Indian cuisine. The seeds are used in pickles and curries and the greens themselves are eaten with gusto. The overall flavor of the leaves is more pungent compared to other greens in this family (cabbage, kale & collared), with mature leaves having a hint of bitterness. Often, this dish is made with a mix of greens including dandelions and spinach, all milder leaves and hence efficient at masking the bitterness. The young leaves are eaten as a blended dish and once the plant matures, it is allowed to bloom and the seeds are then harvested for culinary purposes. 

In rural parts of Northern India, fields filled with yellow mustard blooms make the prettiest site. Interestingly, a lot of Bollywood song and dance sequences are filmed around blooming mustard fields ;-)!!! Here's a link to one of the most famous songs filmed in a mustard field .. from the movie Dilwale Dulhania Le Jayenge. Fresh mustard greens are dark green broad leaves with either a flat surface, or a curly leaf depending upon the local cultivar. Nutritionally, mustard greens are low in calories and fats, high in fiber and provide the highest amount of Vitamin A, C and K compared to other leafy vegetables (100g leaves contain about 350%, 110% and 500% of the RDA respectively). They are also a great source of folic acid and anti-oxidants flavonoids, indoles, sulforaphane, carotenes, lutein and zea-xanthin. Overall, these beautiful greens are loaded with goodies.

Sarson ka Saag (Mustard Greens)

A big old fashioned drum roll please!!!! I'm introducing my New Veggie #60. When I started on this quest almost a year ago, I never thought I'd have tried 60 previously untried or less-tried vegetables by the end of the year. The honor of being #60 goes to Mustard Greens. Growing up in India, we ate a lot of mustard greens during the winter months which is when it is in season. The original recipe, Sarson ka Saag, uses clarified butter (ghee) in copious amounts and is eaten with fresh corn-bread (Makki ki Roti), which is also made with a lot of ghee. What I wanted to do today was recreate the dish of my childhood without any of the added fat. I decided to eat it with rice, instead of the traditional corn bread. Although, the skillet cornbread recipe in Everyday Happy Herbivore would be great with this dish.  

Punjabi Sarson ka Saag
Prep Time: 20-30 min

Serves: 2

Ingredients:
  1. 1 bunch of curly mustard greens, washed well, stems removed, and leaves torn
  2. 1 small Red Onion
  3. 1 tbsp Ginger Garlic Paste
  4. 2 tsp Cumin powder
  5. 2 tsp Garam Masala
  6. 1 tsp Smoked Chipotle pepper
  7. Salt to taste
  8. Red Pepper Flakes, for garnish
Directions:
Add first 4 ingredients with a quarter cup of water and pressure cook for 10 min under high pressure. Release steam and open. The leaves should be reduced about 10x in volume. Using a stick blender, puree the contents until smooth. Add Garam Masala and Chipotle pepper and simmer on medium heat, with a lid on partway, until most of the water has evaporated (be careful of the splatter, as it will be super hot!). Mine took about 10 min to get to the right consistency. Still pretty wet, but without any runny water. Add salt to taste. It is best to wait until the end to add salt as it is quite easy to overdo the salt (the volume goes down tremendously, so it is difficult to estimate how much you need). Serve over rice, and garnish with more chipotle pepper or red pepper flakes. 


My Assessment: The flavors were reminiscent of my childhood. My mom used to garnish with red pepper flakes warmed in butter (often called Tadka in hindi). I didn't miss the butter in the dish at all. Give it a try! It was worth it!

Nutrition Facts (Per Serving): Calories 51
Total Fat 0.8 g; Cholesterol 0 g; Carbohydrates 8.6 g; Fiber 2.0 g; Sugars 2.5 g; Protein 2.7 g

Hershey's Peanut Butter Blossoms, a plant-based version

Before I went plant-based, each Christmas I would bake an enormous amount of Christmas cookies with our favorite ones being Hershey's Peanut Butter Blossoms. Given that the recipe calls for a half a cup of shortening, egg and milk, I knew I wasn't going to be making those this holiday season. My DH, who's also been plant-based since October 1st was also interested in finding a no-fat vegan alternative. So I posted a question on the New Herbies page on Facebook - if anyone had come across a vegan version. Of course, I knew I wouldn't be able to find vegan Hershey's kisses and was willing to substitute those out with vegan chocolate chips. Within hours someone had posted a link to a recipe which could be adapted very easily to my ways (no added fats/oils). The best part about this recipe was that it only requires measuring cups and spoons, a mixing bowl, a rubber spatula and a cookie sheet. Of course, an oven would be necessary to bake them ;)

Hershey's Peanut Butter Blossoms, a plant-based version
Recipe Adapted from: My Vegan Cookbook

Prep Time: 30 min including bake time.

Ingredients (24 cookies):
  1. 1/2 cup Whole Wheat Flour
  2. 1/4 cup Ground Flax Seed
  3. 1/2 cup Quick Oats (I used Quaker oats)
  4. 1/2 Cup Brown Sugar (I used dark brown sugar)
  5. 1 tsp Baking Powder
  6. 1/2 tsp Baking Soda
  7. 1/4 tsp Salt (optional, I made w and w/o salt; found no difference!)
  8. 1 tsp vanilla extract
  9. 3 tbsp Applesauce (I substituted 2 tbsp Canola oil with Applesauce)
  10. 1/4 Cup Maple Syrup
  11. 1/4 Cup Creamy Peanut Butter (I used Kroger brand) 
  12. 1/2 cup Non-Dairy Chocolate chips (I used Ghiradelli Semi-Sweet)
  13. Raw sugar, or granulated sugar, as needed for rolling (I used granulated sugar today).
Directions:
As the original recipe says, preheat oven to 325 F and dump all the ingredients (in my version, with the exception of the chocolate chips) into a mixing bowl and stir. I used a rubber spatula and occasionally scraped the spatula with a spoon to mix whatever was stuck to it with the rest of the dough.  Once everything was nice and well mixed, I rolled 1 tbsp sized amounts into a small ball, then rolled the ball in sugar and placed each ball onto a greased cookie sheet. My DH pressed each ball with a fork (twice, cross-wise). Sprinkle 5-7 chocolate chips on each ball and bake 12-14 minutes until bottoms are slightly golden. Transfer to a cooking rack. For the kids, we baked the cookies plain and then added a Hershey's kiss on top, so that the cookies looked like the Omni version. I shouldn't have worried the kids gobbled these up!! As the original recipe says, after they are baked let them cool for 15 minutes before you dig in. The cookies are soft out of the oven and crisp up as they cool. Do not leave them uncovered for too long as they do tend to dry up when left out too long.

... with Hershey's kisses on top, like the original HPBBs
My Assessment: These cookies turned out great!! My next batch, which I plan to make later this week I plan on actually mixing in the chocolate chips into the dough before I roll the cookies in sugar. Today, my 3-year old was helping with the sprinkling of chocolate chips so they're a tad unevenly decorated :) Taste great though!! 
Plant-Based HPBBs with Chocolate Chips Mixed In
Recipe Update: December 19, 2012: So I made a double batch again tonight because the last batch lasted only about 2 days in our house. This time, instead of sprinkling the chocolate chips on top, I mixed 1/2 a cup of Ghiradelli Semi-Sweet (vegan) Chocolate chips in with the dough. So for 1 recipe, I would only add 1/4 cup. Once the chips were well mixed, I rolled the dough into small ball, then rolled the ball in sugar and baked for 14 minutes until bottoms are slightly golden. Voila!! Not as pretty as the sprinkled cookies but the chocolate was more evenly distributed and you could taste in each bite!! 

Unpressed HPBBs with Chocolate Chips Mixed In
Second Update: January 12, 2013 : Once the cookie dough is mixed up, put it in the fridge for 20 min. This allows to flax seed meal to swell and the cookies are also less messy to roll. Also, learnt from a friend, if you don't press the cookie balls down, the cookies come out nice and plump, like the original HPBBs. Enjoy!

Nutrition Facts (Per Cookie): Calories 81
Total Fat 2.8 g; Cholesterol 0 g; Carbohydrates 12.9 g; Fiber 1.2 g; Sugars 8.8 g; Protein 1.8 g

Veggie Fact of the Day

Flax Seed, New Veggie #58
Flax Seed became New Veggie #58. Also known as Linseed, it has notable heath benefits. Ground flax seed can be added to baked goods, shakes, smoothies, cereals and other dishes. Notable micronutrients include manganese, selenium, calcium, magnesium, phosphorus, potassium, iron, zinc and copper. In addition, flax seeds are rich in B vitamins, especially B9 (folic acid) followed by B1 (thiamine), B2 (riboflavin), B3 (niacin or niacinamide), B5 (pantothenic acid), B6 (pyridoxine) and also in Vitamin K. 

Flax seed is a great source of lignans, compounds that have been shown to regulate the menstrual cycle in women. Lignans have also been implicated in prevention of breast and colon cancer. In addition, lignans have also been implicated in the prevention of diabetes. Perhaps the most important fact about flax seeds is that they are a rich source of Omega-3 fatty acids, in particular alpha-linolenic acid (ALA). 

For non-fish eaters, flax and Chia seeds are perhaps one of the richest sources of Omega-3 fatty acids, which are essential for fighting inflammation. There is a lot of evidence suggesting that inflammation plays a key part in many chronic lifestyle diseases that affect our bodies - heart disease, arthritis, asthma, diabetes and various cancers. While ALA by itself is not sufficient, and we also need Omega-6 fatty acids, flax seed does go a long way in providing one ALA. So eat away!

December 17, 2012

Veggie Fact of the Day

I've been attempting to hit 60 new veggies this year and I think I have a pretty good chance of hitting that magic number before the end of the year ;-). Today, I tried Chia Seeds in my morning smoothie, making it New Veggie #59. Like most people, I'd only heard of Chia seeds in the context of those (in)famous Chia Pets before I started on my plant-based journey. I often wondered what people did with those little ceramic animals after the fur-like sprouts were dead?

Chia is an edible seed that comes from the desert plant called Salvia, a member of the mint family. Dating back to ancient Mayan and Aztec cultures, Chia literally means 'strength' and according to ancient wisdom, the seeds are an energy booster. The seeds contain healthy omega-3 fatty acids, carbohydrates, protein, fiber, antioxidants, and calcium. The flavor is mild, somewhat nutty, with just a slight crunch to them. They are easily added to foods and beverages and can be eaten unprocessed, sprinkled on cereal, sauces, vegetables and rice. Soaking the seeds for 8-10 minutes produces a gel which can be used to thicken puddings and desserts. Because the antioxidant content of Chia seeds is higher than any known whole food, even blueberries, a lot of dietitians recommend a daily dose of Chia seeds.  Because Chia seeds expand in water, they do the same in the stomach and are said to serve as an appetite suppressant. Chia seeds are rich in Calcium and the high protein and fat content is said to provide a steady energy supply. This is due again to the gelling action of the seed, with its unique combination of soluble and insoluble fiber combine to help control blood sugar. Once in the intestine, similar to psyllium husks, the swelling action of Chia helps to cleanse and soothe the colon, and absorb toxins while helping move things along. Chia seeds are also a remedy for constipation. Unlike flax seeds, which tend to go rancid when stored for a prolonged period, Chia seeds, with their rich antioxidant content, last forever. 

So how did I use Chia seeds today? I added a tablespoon to my morning Spinach Smoothie. It was a tad unusual initially but after the first few sips I liked the little crunch the seeds added to my drink. And I did think I was full for a longer time this morning than I usually am after drinking my smoothie. I think a tablespoon of Chia will definitely be making its way into my smoothie every morning. 

December 15, 2012

Baked Purple Sweet Potatoes!

As I was in the store this evening, buying our usual produce for the week, I was also on the lookout for interesting new veggies that I have not tried so far. Just by accident, I noticed Purple Sweet Potatoes on one of the stands. Instantly, New Veggie # 57 was in my cart. Since I wanted to taste the flavors in as natural a form as possible, I opted to bake my potato tonight. 


The Stokes sticker on the potato asked for it to be baked for 1.5-2 hours at 350F. I sure didn't have the patience for that to take place. So I simply scrubbed the skin with a vegetable brush, wrapped the still damp tuber in saran wrap and microwaved it on high for 5 min + 2 min, with a quick check in between to check if it was done. The only disadvantage of nuking a potato or sweet potato in my opinion is that it dries up a tad more compared to when it is oven-baked. When I do have the time, I do try to bake the conventional way, in an oven or in a roaster. 


My Assessment: Despite the unusual color, I thought that these purple tubers tasted a lot like regular orange sweet potatoes. If I ate them with my eyes closed, I don't think I'd be able to tell the difference. I simple had mine with salt and pepper. Yum!

Veggie Fact of the Day


Purple Sweet potatoes are the edible tubers of the sweet potato plants. Compared to their orange counterparts, purple sweet potatoes are much higher in vitamin A than other varieties of sweet potatoes. Each cup of purple sweet potatoes contains only about  114 calories, with 2 g protein, 27 g carbohydrates and no fat or cholesterol. Each cup of purple sweet potatoes provides almost 375% of the RDA for Vitamin A. 

Stokes is probably the biggest local (US) supplier of purple sweet potatoes. Along with the high Vitamin A content, purple sweet potatoes are loaded with anthocyanins, which cause the rich purple color, and other polyphenolic compounds which have antioxidant properties. Purple sweet potatoes are also diabetic friendly, with a lower glycemic index than white potatoes.

December 13, 2012

TVP Mushroom Coconut Curry

Earlier in the week, I had almost a quarter of a gallon of coconut milk left over from my Holiday dinner with the family and I wanted to use it in a savory dish. I was also craving some TVP chunks, Nutrela, which I grew up eating as a kid. Now my DH, who has been Plant Strong for almost 10 weeks now, will eat vegetables and certain kinds of mushrooms but refuses to go near any of the non-traditional vegan food items that I've grown accustomed to including in my meals .. no tofu, tempeh, seitan or soy protein for him. So earlier this week, he wanted to have a bowl of cereal with almond milk for dinner and I decided to cook up something with the things I'd been craving ... Shiitake Mushrooms, TVP chunks and Coconut milk. 

Mild Coconut Curry
Prep Time: 20 min

Ingredients:
  1. 1 oz dried Shiitake mushrooms, reconstituted
  2. 1 cup TVP chunks, soaked in hot water, and rinsed well
  3. 1 x 15oz can of Hunts Fire-Roasted Garlic Diced Tomatoes
  4. ~1-2 cups Coconut milk
  5. 2 tsp Mustard seeds 
  6. 4-6 Curry leaves (optional)
  7. Smoked Paprika, to taste, for a not-so-mild flavor (optional)
  8. Salt and Pepper, to taste.
Directions:
Line a pan with coconut milk and add mustard seeds. As the coconut milk begins to boil, add tomatoes and mix well. Add remaining ingredients, and additional coconut milk to obtain the desired consistency. I made it soupy as I wanted to eat it over rice. I didn't have any curry leaves so I left those out this time. I did use the paprika as it adds a nice smokey flavor to the dish. Cover and allow to simmer for 10-15 minutes until the the aroma of mustard and paprika starts wafting out of the pan :) Serve over a bed of white or brown rice. Enjoy!! 


Veggie Fact of the Day

Beet Greens, New Veggie #56
Beet Greens, are the green leafy tops of beets. With red veins, resembling Swiss Chard, the leaves have a striking appearance. One cup of boiled/wilted beet leaves has 39 calories, no fat, 8 g of carbohydrates and 4 g of protein. Beet greens are also loaded with Vitamins A and C with a 1-cup serving providing a whopping 220% of the RDA for Vitamin A and 60% of the RDA for Vitamin C.

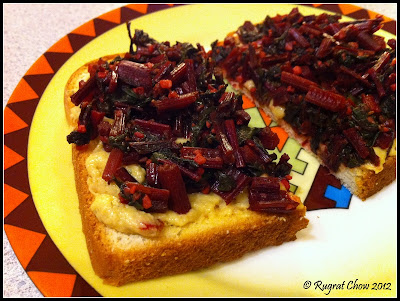
Wilted Beet Greens on Toast

So yesterday I made Braised Beetroots and the beets came with large leafy greens, with the most brilliant red stems (very reminiscent of Swiss Chard, which belongs to the same plant family as Beets).  Of course, there was no way I was going to let those greens go to waste .. no maa'm, no way! I made them New Veggie #56. So here's what I made, and quite honestly, I like Beet Greens a lot more than I liked Beetroots.

Wilted Beet Greens on Toast
Prep Time: 10 min

Ingredients:
  1. 1 bunch of Beet Greens, washed well and diced, including stems
  2. 1 tbsp Minced Garlic
  3. 1 tsp Ajwain (optional)
  4. 1 tsp Powdered Cumin seeds
  5. Salt and Pepper, to taste
  6. 2 tbsp Hummus
  7. 2 slices of All-Wheat or Multi-Grain Bread, toasted.
Directions: 
Line a skillet with water and add minced garlic, spices and chopped greens. Mix well, making sure there is enough water to prevent burning. If needed, add another splash, or two. Cover, reduce heat to medium-low and allow to cook for 5-7 minutes, mixing once in between. Once the stems are tender, add salt and pepper to taste. Toast the bread, spread with a tbsp of hummus and create an open-faced sandwich. Enjoy warm. 


My Assessment: I loved my easy-peasy dinner. 10 minutes to a delicious dinner. the greens have a hint of bitterness which is often noted in mustard and collard greens and the red stems added a nice punch of color. I went for the easy route of topping toast but this preparation of beet greens, by itself, would also make a great side dish. Yum!


Herb & Spice Fact of the Day

Ajwain (Carom) seeds are a pale tan in color and look like a smaller version of cumin seeds. 

The overall flavor is similar to Thyme, with a strong, dominant flavor. In Indian cuisine, ajwain is often used in vegetable dishes (for its distinctive taste) and in pickles (for its preservative qualities). It is believed to aid in digestion and also in reducing flatulence (e.g. from consuming beans). When distilled, Ajwain produces Thymol which is used a medicinal ingredient in Ayurveda! Water boiled with ajwain is used for relieving symptoms associated with diarrhea, dysentery and indigestion. For colds and flu-like symptoms, inhaling the steam of ajwain water has been shown to be effective. And ajwain oil massage has been shown to provide relief rheumatoid arthritis and joint pain.

Herb & Spice Fact of the Day

Mustard Seeds are small round seeds obtained from a variety of mustard plants. The small (1-2 mm) seeds range in color from pale yellow to black. Each of the 3 major varieties of mustard produce pungent aromatic seeds with the mildest being the white mustard. 

In Christian mythology, Jesus used the mustard seed as a parable for the kingdom of God. He mentions hows it initially starts small but grows to be the biggest of all garden plants. 

Mustard seeds are used as a whole or ground spice and are often used also to extract mustard oil, which features prominently in Southern Indian cuisine. With its excellent preserving qualities for foods and is often used for pickling and to make the often used condiment - mustard. 

The seeds have 46-48% oil and close to 43.6% protein, so are nutritional super-powers, but are also packed with calories so should be used sparingly (~500 calories/100g). The seeds are high in essential oils as well as plant sterols such as brassicasterol, campesterol , sitosterol, avenasterol and stigmasterol. They also contain sinigrin, myrosin, erucic, eicosenoic, oleic and palmitic acids. Although rich in calories, they are also well packed with fiber and are actually recommended in cholesterol and weight reduction programs. The seeds also flavonoid antioxidants such as carotenes, zeaxanthin and lutein and have small amount of Vitamins A, C and vitamin K and E (tocopherol-γ). 

In traditional medicine, mustard seeds have traditionally been used to relieve muscle pain, rheumatism and arthritic pain. In India, mustard oil is applied over scalp and is believed to stimulate hair growth. and in traditional medicine, the ground seeds (meal) have been shown to act as a laxative, a stimulant of the gastric lining and have been shown to increase intestinal secretions.


December 12, 2012

Veggie Fact of the Day

Beetroots, New Veggie #55
Beets or Beetroots are deep red-purple colored roots of the beet plant. It belongs to the same family as Swiss Chard and Sugar beet. While the purple variety is most common, beets are also available in golden yellow and red-and-white striped varieties. 

In the US, beets are most often eaten pickled, or boiled in cold salads. The consumption of beets causes pink urine in some people. Beetroot juice has been found to improve performance in athletes, possibly because of its abundance of nitrites. 

Ancient Romans also used beetroot as a treatment for fevers and constipation (note: they also considered it an aphrodisiac ... strange!). In the Middle Ages, beetroot was used as a treatment for a variety of conditions, especially illnesses relating to digestion and the blood. Platina recommended taking beetroot with garlic to nullify the effects of 'garlic-breath'. 

The purple pigment, betacyanin, has been shown to have antioxidative properties. Like other members of this family of vegetables, all parts of the beet plant contain oxalic acid which have been implicated in the formation of kidney stones in certain populations of people; cooking the beets usually reduces the risk. Beets have a distinctive earthy flavor that is enhanced by roasting. Apparently beets are more flavorful and colorful if you leave the peel and some of the stem on while cooking. The peel apparently comes off easily once the beets cool (mine did not peel, maybe because the scrubbing I gave them made the peel really thin).

Balsamic Braised Beets

So after a year of psyching myself, I finally bought some beets over this past weekend. Somehow, I've been ultra nervous about trying them. I just don't good beet memories from my childhood. Over the past several months, I've had them on my new veggie list and I finally decided to pick up a bunch when I came across this  rather old article about the health benefits of beets. It may be a few years old, but the information has not changed much. Beetroot today becomes New Veggie #55.

Balsamic Braised Beets
Prep Time: 20-25 min

Ingredients:
  1. 1 bunch beets (pick the small ones)
  2. 1/2 cup diced white onions
  3. 1/2 cup Balsamic Vinegar
  4. 4-6 Basil leaves, diced
  5. Pepper, to taste
Directions:
Scrub beets using a vegetable brush and cut off green tops and tips. Cut into halves or quarters (try and keep all the pieces the same size). Add balsamic vinegar and onions to a cast-iron skillet and allow onions to wilt. 


Turn heat on high and move onions to the sides of the skillet. As the skillet heats up, place beets directly onto the hot surface to allow them to sear. Then add a splash (or two) of water, mix everything together so the onions are spread evenly in the pan again. Reduce heat to medium, cover and let simmer. After 10 min, turn each piece over, cover and continue to simmer until beets are fork tender. Mine took about 16 min today. Garnish with freshly cracked black pepper and fresh basil leaves.


My Assessment: While I liked the flavors of the onions and balsamic, mixed with the fresh basil, I must clarify that this preparation of beets did nothing to endear the beet to me. I'm not a big fan of radishes and beets gave me that same pungent aftertaste which I am not a fan of. So for me, this was a so-so recipe. 

December 5, 2012

Miso & Garlic Tofu Stir-Fry

In my humble opinion, a stir-fry is the easiest way to consume fresh vegetables in a hot dish without losing too much of the nutritional value (as opposed to eating the raw veggies). I often make quick stir fries out of whatever veggies and/or mushrooms I have handy, and have in the past often used commercially-made Asian sauces such as Vegetarian Thai Peanut Sauce or Vegetarian Oyster Sauce. While these sauces are great, they do contain a lot of added sodium and also the mystery ingredient "natural flavors". So today, I tried to make a stir-fry which was made with simpler ingredients and didn't have anything I couldn't identify in my pantry. 

Miso & Garlic Tofu Stir-Fry
Prep Time: 20 min

Ingredients*:
  1. 1 block (14oz) Extra-Firm Tofu, pressed** and diced
  2. 2 bunches of Scallions (white parts halved and leaves separated)
  3. 1 cup Baby carrots, thinly sliced, if needed
  4. 2 large Oyster Mushrooms, sliced
  5. 6-8 White mushrooms, sliced
  6. 2 tbsp Low-Sodium Soy Sauce
  7. 1 tbsp White Miso
  8. 1 tbsp Ginger-Garlic Paste
  9. 1 tbsp Minced Garlic
  10. 1 cup (or less) Vegetable broth
  11. Pepper, to taste.
  12. Brown Rice, steamed, 1 cup
Directions: 
Mix miso in about an 1/8 to a 1/4 cup of vegetable broth until completely dissolved. Set aside. If your rice is not previously steamed, fill a stock pot with water and add rice, and set it to boil on the back burner, once the water comes to a rolling boil, reduce heat to medium-high and allow to simmer until the rice is tender. Drain and rinse, like pasta. Set aside.  While the rice is boiling, line a large skillet (or wok, if you have one!) with broth. On high or medium-high heat, and add ginger-garlic paste and the extra garlic (for the extra oomph!). Once these release their aroma, add soy sauce and immediately add all the vegetables and a splash of vegetable broth. Stir fry for a couple of minutes until vegetables are done (to your taste) and add the diced tofu, toss well. Generally, I like to leave the vegetables just a tad crunchy and don't let them become fork tender. Mix well. Turn off heat (but leave the pan on the stove). Add Miso/broth mix and stir everything together. Cover and let sit for 2 minutes to allow the miso to release its flavors and for the tofu to absorb as much of the flavors as it can. Serve over steamed brown rice. Garnish with freshly sliced scallions and freshly cracked black pepper. 

Miso & Garlic Tofu Stir-Fry
My Assessment: Umm Umm Good!!! I had 2 huge guilt-free bowls tonight and I have enough leftovers to  take for lunch tomorrow. This recipe makes 4 good size servings. T tried the last serving and picked at it because he's not a fan of tofu.  

* This is a no-added-salt recipe. The soy sauce and miso had so much flavor and natural salt that I didn't add, or feel the need for, any salt at all.
** Press tofu between kitchen towels, with a weight on top for 5-10 min. This removes excess liquids and then the tofu tends to absorb fluids from the vegetables and the sauce and takes on a lot more flavor.