July 31, 2012

FFVK Creamy Zucchini & Basil Soup

This post is Part 2 of my efforts to use the Ginormous Zucchini I inherited from my babysitter. Earlier in the week I used half of it in a Zucchini Curry. I had the bottom half remaining and decided to try this soup someone suggested. FFVK stands for Fat Free Vegan Kitchen which happens to be Susan Voisin's awesome blog.  A friend sent me the link for the Creamy Zucchini & Basil Soup and I tried that tonight!


I loved it!!! It was super easy to make. Instead of the recommended cashews, I used about an eighth of a cup of Almond milk and I added a little more nutritional yeast to make it a little more cheesy :) ! Other modifications had more to do with kitchen appliances. I pressure cooked the zucchini and onions in broth for 5 minutes and I used a stick blender to puree the soup. Thank you FFVK!!! This was amazing!


July 29, 2012

3 Rice, 3 Berry, 3 Herb Salad

Summer Days call for chilled salads, Summer Days are Berry Days, and Summer Days are Fresh Herb Days as well. We had a 3x Birthday party in the family today and I wanted to make sure I had a plant-based dish to take along. I wanted to try Chef AJ's Quinoa Salad with Currants and Pistachios - but our niece is allergic to nuts and I wasn't sure if she'd ever been tested for Quinoa. But now, my mind was hooked on to memory of that salad :) !!! I decided to make a variation of it. Here's what I came up with. 

3 Rice & 3 Berry Salad
Prep Time: Overall 30 min, or so in 2 stages.

Ingredients: 
  1. 1/2 cup White Basmati Rice
  2. 1/2 cup Brown Basmati Rice
  3. 2-3 tbsp Long grain Wild Rice
  4. 2-3 tbsp Raisins
  5. 1 cup fresh Red Raspberries
  6. 1 cup fresh Blackberries
  7. 1 cup fresh Strawberries
  8. 2 tbsp Agave Syrup, or Honey
  9. 1/8 cup Soy milk
  10. 2 tbsp fresh chopped Basil, 
  11. 2 tbsp fresh chopped Mint 
  12. 2 tbsp fresh chopped Oregano
Directions: 
Boil rice, all 3 kinds together, in ample amounts of water until tender. Add the raisins to the boiling water for the last 2 minutes (this helps plump them up!). Drain and spread thinly on a cookie sheet and put in the refrigerator for 30 minutes (chill completely). Meanwhile wash and drain berries and slice strawberries and set aside. Put Agave syrup (or honey) in a small microwave safe bowl with the non-dairy milk and heat for 10 seconds to dissolve it in the milk. Once rice is chilled, move to a mixing bowl, add agave/milk mixture and toss well. Add chopped herbs and berries and give a final toss. Do a quick taste check - the rice should be just slightly sweet - add more 'agave in milk' if needed.


Cover and chill until ready to serve. The longer it sits, the better the flavors combine - the berry flavors and juices penetrate the rice, the herbs release their essential oils and flavor the rice and the berries! This is a salad where the wonderful aromas invite you to dig in.

My Assessment:  Loved it. What's not to like! The family liked it too :)

July 28, 2012

Zucchini Curry

Zucchini curry over White rice
So my babysitter has been on vacation since Friday. On Thursday evening, as I was picking my son up, she asked if I'd like some home-grown zucchini. Somebody had given her some and with her leaving on vacation, she didn't want it to go bad. I agreed to take it off her hands and lo & behold .. look what she brought out of her kitchen for me!! Yes, that is the current issue of Time magazine. 


After it sat on my kitchen counter for a day, I posted a picture on FB and asked friends to provide ideas on what to do with it. I got zucchini spaghetti, zucchini pizza, zucchini bread, muffins and soups. All of them sounded really good. In my mind though I was dreaming about Lauki (Opo Squash) Curry - comfort food at its best. I grew up eating lauki in India and its hard to find a good looking Opo here in the US, except at oriental and Indian stores. So some of this bounty had to go towards at least an attempt at making Zucchini Curry!! Here's the recipe ... 

Prep Time: 10 min to prep, and 10 min to pressure cook.

Ingredients: 

3-4 cups of diced zucchini
1 can (16oz) of diced tomatoes, or 2 fresh (medium) tomatoes
1 tbsp Ginger-Garlic Paste
2 tsp Cumin seeds
2 tsp Coriander powder
1/2 tsp Turmeric
1 tsp Red Chilli powder
Salt and Pepper, to taste
Fresh cilantro leaves, to garnish

Directions:
Peel zucchini (if desired). I left the skin on because it was an organic zucchini from someone's garden. Remove seeds from the core if they're large and woody. Softer seeds are of course more edible. 


Cut into large 1-2 inch chunks and place in a  pressure cooker. 


Add tomatoes, and all spices, and 1/3 cup water and steam under pressure for 10 min. 


Let the steam release on its own. Open and use a wooden spoon to mix everything together. Garnish with cilantro and add salt/pepper, as needed. Serve over white rice. Yum!! 


This was seriously good. It tasted a lot like lauki curry. I'd definitely make this again!! I ate a good size portion for dinner and have 3 portions to freeze and still have of that squash left over :)

July 27, 2012

Banana Chocolate Ice Cream

In my younger, on-my-own lonesome days, I often spent a Saturday evening at home with my dog by my side, and Netflix on TV and a pint of ice cream. I've been known to have ice cream for lunch and again for dinner, all in the same day. I've also been known to say "I can live on ice cream". Since going plant-based, I don't think I've found a non-dairy ice cream that I've really enjoyed. I tried the So-Delicious brand of products for a while, but soon got over that. And who wants all those saturated fats from coconut milk. As part of a 'New Herbies' group on facebook, I've often read posts from people about banana ice cream. My first thought .. ew! I've never liked banana milk shakes. I don't like banana splits. I only eat bananas as they just start to ripen. Blemished bananas, with soft spots, are quite gross in my opinion. But this year, from the very beginning, has been about trying new things, even those that I'd never dreamed of eating. So when I had a couple of bananas becoming a little over ripe last week, I pealed them, dropped them in a tupper-ware and placed them in the freezer.

On-my-own again tonight with Nik in bed, and the older boys at a movie theater, and my dog by my side, and the Olympics opening ceremony on TV and of course, I'm suddenly thinking of that pint of ice cream :) I used an HH Raw Ice cream recipe, with my modifications, of course.


Prep Time: 5 min with previously frozen bananas

Ingredients: 
  1. 2 frozen bananas (peeled, of course prior to freezing)
  2. 2-3 tsp Cocoa powder
  3. 1-2 drops Vanilla extract
  4. 1/4 cup Almond milk.
  5. 1/8 cup fresh berries.
Directions:
Transfer all ingredients to a food processor fitted with an S blade. Add only half the almond milk to prevent splashing. Blend until smooth. Add the rest of the milk and blend again! Garnish with fresh blackberries and serve immediately. Yum! 

My Assessment: I LOVED IT!!!! 

Going Unprocessed for 30 Days ... !

I've been on this plant based journey for about 7 months. I've lost 18 lbs and I'm down at least 1 size, if not more. Some of my old summer clothes, which I hadn't been able to squeeze in for about 2-3 years, now fit. Bear in mind, these are post-pregnancy clothes. Of course, I do have those OLD OLD clothes that I'd love to fit in one day - soon! :) 


So here I am, 7 months on, and this time I've decided to take a 30-Day Unprocessed Challenge. I've followed Chef AJ and her book Unprocessed since I heard her talk in Columbus, Ohio a couple of months ago. She's often referred to her 'Unprocessed Challenge' and since I've been in a weight-loss rut, I decided to challenge myself ... so here I am ... 5 days in and I'm not sure how much I've lost yet (I weigh myself on Saturday mornings!), what I have learnt is that it is NOT EASY! So what is this challenge, one might ask?! Well, all it means is that I will 'attempt' to only eat unprocessed foods. If I can't take a raw food and bring it to the state that it can be bought in - I don't plan on eating it (e.g. fresh vegetables and beans can be processed at home, to be equivalent to their canned counterparts). Get the drift? 

Day 1 (Monday) started off really well. Spinach, Strawberry and Almond milk smoothie for breakfast, baked sweet potato (with hot Salsa), and Kale with lentils for lunch. I had a banana and half a cucumber for snack. Then, I came home and fell off the wagon ... I made Mushroom & Vegan Sausage Pizza for Nik. Parts of it were quite processed and quite greasy. Oh well, we all fall off the wagon every once in a while!! No Sweat! I got right back up .. dusted myself off ... and prepared myself for Day 2.

Day 2 (Tuesday) started off with the same smoothie. Had a baked potato and a side salad for lunch. Even though I was careful to order my salad with no cheese and no meat, I did get candied walnuts on it (darn it, hidden processed foods!). I was with some clients, so instead of picking at each little walnut, I ate it leaving out as many walnuts as possible. Dinner was excellent - I made Cauliflower Rice - low fat, high fiber, high nutrient, low starch and ate it with a cauliflower and carrot stir fry. Perfect!!! Way to go missy!! :)

Days 3-5 (Wednesday through Friday) have gone reasonably well. I've had a green smoothie every day for breakfast. I had leftovers over from my Day 1 lunch and Day 2 dinner for 2 more meals. I went out to my favorite Mexican restaurant one day for lunch (vegetarian fajitas - mushrooms, zucchini, summer squash, tomatoes, onions and green peppers, all tossed in fajita seasoning). Today, I went to a local salad bar and got a fresh green salad with loads of chickpeas and peas and carrots and green peppers for lunch!! And, I had enough cauliflower rice left over to eat with some quick canned Rajma Curry

Throughout the week, instead of cereal bars or dried fruits/nuts for snack, I've had a banana, or sliced cucumber, or strawberries instead. Given how strongly plant-based I had become over the last 7 months, going completely 100% unprocessed hasn't been that difficult so far ... except for the hidden dangers. Overall, although not perfect, my first full work week being unprocessed went really well. Now for the big reveal - tomorrow morning!! Keeping my fingers crossed.

Saturday Morning Update: 5 days Unprocessed equals 2 lbs!! Yay! I broke the 20 lb mark!!

July 24, 2012

Gimme More ... Cauliflower Rice

This recipe has become a favorite almost overnight! I tried it a week or so ago with a small cauliflower, and ate leftovers for lunch the next day. I made it again tonight and I have to give it the honor of being Gimme More! I love how quick and effortless it is to prepare (see recipe here), and how little it has in terms of calories. Yet, it is packed with fiber and nutrients. I don't feel guilty eating a second helping. Its way better tasting than any other grain (rice, brown rice, barley, quinoa) and has far less in terms of starch and carbs and goes perfectly with my Quick Stir Fry!! LOVE IT!! I had the rice today with a Chickpea and Shredded Carrot Quick Stir Fry. Um Um Good! And yes, leftovers too!

Gimme More ... Cauliflower Rice

July 23, 2012

Mushroom Pizza

So I was going to start a 30-day 'unprocessed' challenge today. I managed to do really well all day - no processed foods all day and then fell off the wagon .... umm totally fell off the wagon!! I came home, and T was planning on having a 'juice' dinner so I had to come up with something really quick for me and my li'l rugrat - & BOOM! Fell off the wagon!! Here's the recipe for those interested. 


Prep Time: 15 min

Ingredients: 
  1. 2 whole grain naans (Stone Fire)
  2. 4 tbsp marinara sauce (I used Ragu!)
  3. 1/2 cup Daiya Mozarella Style Shreds 
  4. 1/2 cup Sliced mushrooms
  5. 2-3 Tofurkey Breakfast Links, diced
Directions: 
Preheat overn to 375F. Place each naan on a flat surface, like a large cutting board, or butcher block. 


Spread 2 tbsp of Marinara sauce on each naan, making sure to cover the edges, without spilling over. 


Then, spread half the daiya cheese on each naan, in a thin layer. 


And finally spread the mushrooms, as many as you like, in a single or multiple layers on top of the cheese. 


And then, add pieces of vegan sausage, as needed, interspersed between the sausage.


Place pizzas on a pizza stone, or non-stick pizza pan, and place in the oven for 8-10 min until edges are browned and the bottom is crispy.... and Enjoy!! 


Nik's Assessment: He LOVED IT. He picked out pieces of sausage off the pizza and was enjoying the melted daiya cheese. 

My Assessment: I hated it!! It is amazing how quickly you lose the ability to process oils/fats in your food. It was way to greasy for me thanks to the daiya cheese. Next time, I will probably try this with a non-fat alternative to daiya like this Melty Pizza Cheese which a friend told me about (thanks Julie!) .. but I found this only AFTER dinner tonight! Next time .... !!!

And here's when I get on my soapbox about unhealthy vegan foods. I already know I should not be eating these high-fat processed foods like vegan cheese and vegan sausage because they are about as unhealthy as their meat/dairy based alternatives.

"Instead of replacing meat with healthier alternatives, vegans too often fill their plates with meat alternatives crafted from highly processed soy proteins bathed in vegetable oil ...//..... Calorie for calorie, fake foods are not much better nutritionally than the animal foods they replace. In some cases, they are worse." - John A. McDougall, MD - In: The Starch Solution

Next step - ensuring that these items are not even brought into my house, because when they're in the fridge, I feel horrid throwing things away and invariably end up eating them - which only makes me feel like the human trash can - & I deserve so much better than that!! :-)

July 17, 2012

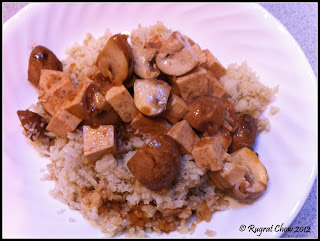
Cauliflower Rice w Mushroom Stir-Fry

The primary reason for my going on a plant-based journey was weight loss. I've tried every, each and every, diet plan out there and knew that what I needed was a complete transformation. I've done a post about it before (see here) so I won't go into the gory details. Suffice to say that weight loss doesn't come by eating starchy grain based products like rice and bread. So, I'm always on the lookout for interesting alternatives to the usual starchy grains. In my quest, I've encountered Barley, Brown rice and Quinoa and have to come to enjoy all 3 of these a lot. However, white basmati rice is in my blood and nothing satisfies the Indian palate more than a bowl of white basmati rice with dal. So, when I encountered some posts on the internet about cauliflower rice and how much it tasted like white rice, I knew I absolutely had to try it. I found a super simple recipe on another blog (Delighted Momma) and followed it to the tee (despite my inner devil ;) that really wanted to add shredded onions, or carrots to it!). I paired it with a Quick Stir Fry which is on my 'gimme more' list. I made it today with diced up tofu and baby portabella mushrooms. Also, since I used cauliflower in an entirely new way today, and because I've not added to my new veggie list in a few days - I assigned Cauliflower the honor of being New Veggie #38.

Cauliflower Rice w Quick Stir Fry
Prep Time: 10-12 min

Ingredients:
  1. 1 head of white cauliflower
  2. Salt & Pepper, to taste
Directions:
Cut cauliflower in small florets, wash and drain. Using a food processor (shredder blade), or a hand-held shredder, shred cauliflower into rice sized grains. Transfer to a microwave safe bowl, with a lid. Season with salt and pepper, give it a quick toss. There is no need to add any water, not even a splash as the cauliflower has enough water of its own. Place lid and microwave on high for 6 minutes. Remove, stir and microwave on high for 2 minutes. Remove and leave covered until ready to eat. 

Shredded Cauliflower Rice
My Assessment: I was quite pleasantly surprised by how good it tasted. I have vivid memories of the smell of cauliflower invading the house when mom cooked curries with it (not a pleasant memory either). The cooked rice didn't smell like cauliflower at all. It was a little chewier than white rice but had the same overall texture. I will definitely be making this again - so simple, and so quick! This might soon be on my gimme more list!! I also can't wait to try making rice with all the different colors of cauliflower ... now that could be a cool dish to take to a pot luck ... !! hmm!

Veggie Fact of the Day


Cauliflower is a white, flowering vegetable belonging to the cruciferous family - which also includes broccoli, Brussels sprouts, collard greens, cabbage, and bok choy. 

Cauliflower is very low in calories (26 calories/100 g), and virtually no fat or cholesterol and it is super rich in dietary fiber (2 g/100 g). Cauliflower florets apparently contain several anti-cancer phytochemicals like sulforaphane and plant sterols such as indole-3-carbinol which appears to function as an anti-estrogen agent. Together these compounds have proven benefits against prostate, breast, cervical, colon, ovarian cancers by virtue of their cancer cell growth inhibition, cytotoxic effects on cancer cells. One Canadian study found that eating a half cup of cauliflower per day reduced the risk of prostate cancer by 52%. It also contains Di-indolyl-methane (DIM), a lipid soluble compound that has been found effective as an immune modulator, an anti-bacterial and an anti-viral compound by potentiating Interferon-Gamma receptors and its production.


Fresh cauliflower is excellent source of vitamin C, an excellent antioxidant that boosts immunity and prevents against infections and cancers. It also contains good amounts of many essential B-complex group of vitamins such as folates (B9), pantothenic acid (B5), pyridoxine (B6) and thiamin (B1), niacin (B3) as well as vitamin K. As a source of omega-3 fatty acids and vitamin K, cauliflower can help to prevent chronic inflammation that leads to conditions such as arthritis, chronic pain, and certain bowel conditions. It has also been shown to contain allicin, which has been found to reduce the occurrence of stroke and heart disease. Additionally, cauliflower can help to lower cholesterol levels in the body. It is also good source of minerals such as manganese, copper, iron, calcium and potassium. Manganese is used in the body as a co-factor for the antioxidant enzyme superoxide dismutase. Potassium is an important intracellular electrolyte helps counter the hypertension effects of sodium. Cauliflower is a great food to include in your diet if you're trying to lose weight because it is low in calories and can be used in a variety of ways. Grated into rice, as intact florets in stir-fries and boiled and mashed in place of mashed potatoes.

July 10, 2012

Seitan & Miso Soup

Even in the middle of summer, some days I crave soup. My sister is a soup-fiend. She always wants more. I'm not as bad as her but a good soup gets me all excited about my dinner. I've been thinking for a few days about making a Miso soup and finally got around to it today. Since this is the first Miso-based recipe I've made, I'm also going to use this opportunity to assign Miso to my new veggie list as New Veggie #35. In addition to Miso, I had 2 other lovely ingredients that also made it to my new veggie list: Seitan - New Veggie #36 and Kombu - New Veggie #37.  At some time in the past 6 months, my new veggie list has been transformed into my New Plant-Based Products :) and that's okay. I'm still exploring and finding new veggies to try and then I come across ingredients such as Seitan and Kombu .. which I've never tried before and which need to be on the list!! 

Seitan & Miso Soup
Prep Time: 20-30 min

Ingredients:
  1. 4 cups of water
  2. 1/3 cup White Miso
  3. 2 Baby Bok Choy, stalks chopped
  4. 6-8 oz White mushrooms, quartered
  5. 1/2 cup shredded carrots
  6. 1-2 inch piece of Kombu (optional)
  7. 8 oz Cubed Seitan 
  8. 2-4 tbsp Low-Sodium Soy Sauce
  9. 1 tbsp Vegetarian Oyster Sauce
  10. Pepper to Taste

Directions:
Bring 4 cups of water to a rolling boil. Add miso to the pot and turn the heat down to a slow simmer. Once miso is dissolved, slowly add mushrooms, carrots, kombu, soy and oyster sauce and allow to simmer. Then, add chopped stalks of bok choy and save the leaves for later. Simmer for 10-15 minutes. For the last 2-3 minutes add seitan cubes and leaves of bok choy. Garnish with freshly chopped black pepper and Enjoy!!

Seitan Miso Soup
My Assessment: I LOVED IT!!! No rugrat assessment today!! Didn't want anything to do with it :) !! Seitan tasted a lot like boiled chicken to me ... somewhat chewy and hearty. I loved the flavor of white miso in this soup - savory and sharp, almost like a sharp cheddar (maybe I'm crazy ;-)!!) ... and the Kombu imparted the flavors of the sea ... !! Great combination of ingredients overall. 

Veggie Fact of the Day

Kombu is an edible kelp, or sea weed, that is widely eaten in East Asia. It is used extensively in Japanese cuisine as one of the main ingredients of soup stock. It is sold dried (dashi kombu) or pickled in vinegar (su kombu) or as a dried shred (boro kombu or shiraga kombu). It may also be eaten fresh in sashimi. 

It is an excellent source of glutamic acid, the amino acid responsible for umami, the Japanese word used for one of the five basic tastes in addition to salty, sweet, sour, and bitter. Kombu is a rich source of iodine and is also a source of dietary fiber.

Veggie Fact of the Day

Seitan Cubes
Seitan or Wheat gluten is simply a food made from gluten, the main protein in wheat. It is made by washing wheat flour dough with water until all the starch dissolves, leaving insoluble gluten as an elastic mass which is then cooked before being eaten. 

It is an alternative to soybean-based meat substitutes such as tofu and tempeh. Interestingly, seitan is believed to have been developed by Mahayana Buddhist monks in ancient China, who were strict vegetarians. Legend also attributes the invention of gluten to the kitchens of Chinese emperors, who developed it for the royal family to enjoy during a week of vegetarianism each year. Commercially available Seitan is brown in color and chewy in texture. It easily absorbs whatever flavors and seasonings are added to it, much like tofu. It is nearly fat free, and has 0 saturated fats and cholesterol. Because the starches have been washed away, seitan is low in carbs and high in protein.


Veggie Fact of the Day

The different varieties of Miso
A slow fermented soybean paste, often mixed with brown rice and/or barley, Miso is indispensable to Japanese cuisine. The flavor is savory and sharp. The paste is mixed with sea salt and the fungus Aspergillus oryzae which is responsible for the fermentation process. The Japanese have been making and using miso for over 1 thousand years and they believe firmly in its therapeutic and gastronomic values. Miso is rich in vitamins, proteins and several minerals such as zinc, phosphorus, manganese and copper. There are 3 kinds of Miso that are commonly available in grocery stores – White, Yellow and Red, with the intensity of the flavor increasing with the depth of the color.

July 6, 2012

Herb Fresh Quinoa Pasta

I started a herb garden this year and right now, despite constant and very regular pruning, I've got an herb-garden-gone-wild situation. An abundance of Basil, a ton of oregano, insane amounts of mint and spearmint and a sage bush :) The only 2 that aren't going so crazy are the rosemary and the cilantro. Anyhow, I knew that I wanted to use a lot of 'something' for dinner tonight, and this is the concoction I came up with. Pretty darned good if I may say so myself!! :)


Prep Time: 20 min

Ingredients: 

  1. 1 10oz Pk Ancient Harvest Quinoa Spaghetti
  2. 1 16oz bag of frozen french-cut Green beans (or use fresh beans).
  3. 1 tsp minced garlic
  4. 1/2 to 3/4 cup non-dairy milk
  5. 1/8 cut fresh chopped Basil and Oregano
  6. 1-2 tsp white Miso
  7. 1/4 cup Daiya Mozzarella style shreds
  8. Salt & Pepper, to taste
Directions:
Boil spaghetti according to package directions and set aside. In a skillet, add a third of a cup of non-dairy milk and add minced garlic and Miso. Once the milk begins to boil and the miso dissolves, add green beans and cook on medium until tender.  Then add the remaining milk and bring to a quick boil. Add most of the cheese to the milk and allow a minute or so to melt. Then add spaghetti and give it all a good toss. Cover and let sit for a few minutes to allow the spaghetti to absorb any remaining liquid. Uncover, mix chopped herbs in and give another quick toss. Garnish with freshly cracked black pepper and salt, if needed, and top off with mozzarella shreds.  I didn't add any salt at all today as the Miso provided quite a bit and the dish had a slightly sweet refreshing flavor of the fresh herbs. I tried Miso for the first time today and loved the sharp cheesy flavor it imparted to the dish. Um Um Good!! 


Coder Household Assessment: Li'l Nik loved it!!  More than the pasta, he picked green beans from his plate. Tony had enjoyed this dish so much the first time I made it that he actually requested I make it again today!! Overall, a hit!!

What is Miso? Happy Herbivore has done a couple of different posts about it. Here's a link

July 4, 2012

Gimme More ... Chickpea Salad!

This recipe is definitely a Coder favorite. Our favorite Indian restaurant in Columbus used to have something along these lines as part of their Sunday Buffet. This is a recipe my mom and I devised - it is simple, nutritious, has no added fat and is perfect for a summer afternoon.  Tony asks for this salad on a fairly routine basis and we always keep a few cans of chickpeas on hand for this super-healthy super-quick snack - definitely a gimme more recipe!! 

Gimme more ... Chickpea Salad
Prep Time: 15 min

Ingredients:
  1. 2 14-oz cans of Chickpeas, drained, rinsed
  2. 1 large Cucumber
  3. 1 medium Red Onion
  4. 1 large Tomato
  5. 12-16 fresh mint leaves
  6. 2 tbsp MDH Chunky Chaat Masala, to taste (optional)*
  7. 1-2 tsp Amchoor powder (dried young mango powder) or Lemon/Lime juice
  8. Salt & Pepper, to taste
Directions:
Thinly slice onion, cucumber and tomato and set aside. I use a 'mandolin'-type slicer and it works great. In a deep pot, bring 3-4 cups of tap water to a boil. As the water is heating up, prepare another bowl with ice water (more ice, less water). Once the water is at a rolling boil, add rinsed canned chickpeas, boil for 2 min and then blanch immediately by draining and transferring to the ice water. Let the chickpeas cool and meanwhile mince the mint leaves as well. Add spices and mint to the sliced veggies and toss everything together. Drain and add chickpeas and give another good toss. Do a quick taste test, add more condiments, as needed and enjoy!! 

This is a great summer salad for picnics, barbeques and even July 4th outings!! It never lasts in our house, no matter how much I make. Scale recipe up as needed. :)

* if you don't have Chaat masala, use a sprinkling of roasted cumin powder, salt, pepper, paprika and lime juice for a similar flavor. If you have dried pomegranate seed powder .. that makes an excellent addition too.

Gimme More ... Dal Makhani

Here's another one of our favorites. Tony's, Alex's, li'l Nik's and even mine. In our household, Dal Makhani is definitely a gimme more and is typically made by the crock-load and doesn't last long!! A hot summer day off in celebration of our freedoms definitely called for a slow-cooked meal. Yum!!  


Today's preparation, as always, was enjoyed with Jeera Rice - white Basmati (long-grain) rice boiled with Cumin seeds and drained (just like pasta). 

Red, White & Blue Smoothie

For the past few weeks, I've started my day with a Green Smoothie. I've given up my morning coffee (although I still drink a couple of cups of tea a day). Its a super-refreshing start to the day and I love knowing that I'm starting the day with a boost of antioxidants and vitamins and minerals. Here's my standard single-serve recipe. Today's patriotic version is full of Red, White and Blue goodness!! 

I typically make it in a tumbler that I can take in the car with me. For the first couple of weeks, I used a stick blender which works just great if the fruit is fresh. For the last week, I've used my new Ninja Pro Blender, which comes with 2 single-serve blender cups/tumblers. The Ninja works great with frozen fruits as well and is much quicker. 

Red, White & Blue (Green) Smoothie

Mix Red Strawberries (4-6 pieces), White Almond Milk (1/2 cup) and Blueberries (10-15 pieces) in a tumbler with one pitted date (optional) and fill the rest of the tumbler (between 1/2 to 3/4) with Baby Spinach. Add ice, if needed. Blend and Enjoy!! Happy Independence Day!!!

Recipe Update (December 12, 2012): For an especially nutty flavor, add 2 tbsps of Chia Seeds to the smoothie. Umm Umm good!

July 2, 2012

Vegetable Dum Biryani

Almost any kind of rice dish is comfort food for an Indian. My son, born and raised American, definitely has India in his blood ;-) because he is most definitely a rice eater. A quick 20 minute meal tonight called for Vegetable Biryani. Loads of vegetables and spices and white rice make for the perfect comfort food. 

Vegetable Biryani
Prep Time: 20 min

Ingredients (6 Servings):
  1. 1 cup long-grain Basmati rice
  2. 1 small red onion
  3. 2 cups vegetables (I used shredded carrots, green beans, shelled edamame and shiitake mushrooms)
  4. 2 tsp ground Cumin
  5. 2 tsp ground Coriander
  6. 1 tbsp Garam Masala, or to taste
  7. Salt and Pepper, to taste 
  8. Hot Sauce, or any Spicy Indian Pickle
Directions:
Dum Biryani
In a deep stock pot, add 1/2 cup water and red onion. Once the onion becomes translucent, add the other vegetables and all dry spices (save 1 tsp Garam masala). Once the vegetables are tender, rinse rice in tap water to get rid of any dust and add to the pot. Add 2 cups water and bring to a boil. Then, cover and reduce heat to medium low. Cook until rice is tender (~10 min). Turn off heat. Sprinkle remaining garam masala over the rice and replace the lid. Add a weight (a few cans of beans) to the lid and let sit for 5-7 min. This is the 'dum' phase - literally it means adding strength. What it does is allow all the flavors to blend, allows the rice to absorb any remaining water and the whole dish becomes fluffy. 

He's 100% a Sawhney kid. Loves his rice, just like Nanu!!
Nutrition Facts (Per Serving)*: Calories 155 (Fat Calories 5)
Total Fat 0.6 g; Carbohydrates 33.7 g; Fiber 2.6 g; Sugars 2.9 g; Protein 4.6 g

*Nutrition Facts Added March 25, 2013 (Using 1 cup peas, 1/2 cup carrots and 1/2 cup Corn).

July 1, 2012

Indian Hummus

I recently saw a clip from HLN TV where Julienna Hever demonstrated an Indian Hummus Dip. I thought that was a cool idea and finally decided to make it today. It turned out great!! The recipe is freely available on the internet, so I've posted it here. The credit of course, goes to Julieanna.

Indian Hummus
Prep Time: 10 min

Ingredients:
  1. 1 can of Garbanzo Beans (Chickpeas), drained & Rinsed
  2. Juice of 1 lemon (~3-4 tbsps)
  3. 2 tbsp Tahini (Sesame butter), drain the oil on top.
  4. 1 tbsp Maple syrup
  5. 1/2 tsp Turmeric
  6. 1 tsp Curry Powder (or Garam Masala)
  7. 1 clove of Garlic (1 tsp minced)
  8. Sea Salt and Pepper, to taste
  9. 1/2 cup Water
  10. 1 cup Raisins (optional)

Directions:
Mix everything together and blend until smooth. Julieanna's original recipe called for 1 cup raisins to be mixed in the hummus after it was smooth. I didn't use any today. Also, I used Penzey's Sweet Curry powder since I have a small jar at home, but once that runs out, I'll be using Garam Masala to replace it. I had it tonight with some sliced cucumbers and will be enjoying the rest of it through the week with a bunch of other stuff. Love the fact that its homemade and hasn't been sitting on the refrigerated shelf @ Kroger's!! :)

Tacos de Papa

Tacos de Papa (Potato Tacos) is a great breakfast dish and is often served in Tex Mex cuisine as a Breakfast Taco.  Having lived in Austin TX, I really miss breakfast tacos. This morning I had some Red potatoes that were were to sprouting shoots in the next day or so and I knew I wanted to use them. Here's what I came up with. 

Tacos de Papa
Ingredients:

  1. 6-8 red potatoes, diced into small chunks
  2. 1 tsp minced Garlic
  3. 1 tbsp Onion flakes
  4. 1-2 tsp Cumin
  5. 1-2 tsp Taco seasoning
  6. Salt and Pepper, to taste
  7. Salsa, to taste
  8. 2-4 Tortillas (I prefer corn, but all I had today were flour!).

Directions:
Preheat oven to 400F. In a large mixing bowl, combine tomatoes and all spices, and add a splash of water. Toss everything together until spices are evenly distributed. Spray a baking sheet with a thin film of cooking spray and spread potatoes in a single layer. Bake uncovered until golden brown; you may need to toss them a couple of times in between. Warm tortillas by wrapping in aluminum foil and placing in the oven along with the potatoes for the last couple of minutes. Once potatoes are done, remove from oven, and wrap in warm tortillas with a little bit of salsa. Yum! 

Notes & Options:
* These potatoes can also be eaten as a side-dish with whatever else you may be having for dinner. ** Toss these crispy potatoes into a salad instead of croutons, for some no-fat crispy croutons. *** If you don't want the oven on in this heat, you can easily make this in a skillet, except the potatoes don't get as crispy as they do in an oven and sometimes get a little mushy. **** Eat these potatoes with some Tofu Scramble if you're looking to add some protein to the meal.